Easy Salami and Cheese Skewers Recipe
If you’re looking for a quick, crowd-pleasing appetizer that looks as good as it tastes, these salami and cheese skewers are the answer. They’re fun to assemble, require only a handful of ingredients, and come together in minutes. Perfect for any gathering — from casual movie nights to elegant holiday spreads — this is one of those recipes that makes entertaining feel effortless.

Why I Love Making Salami and Cheese Skewers
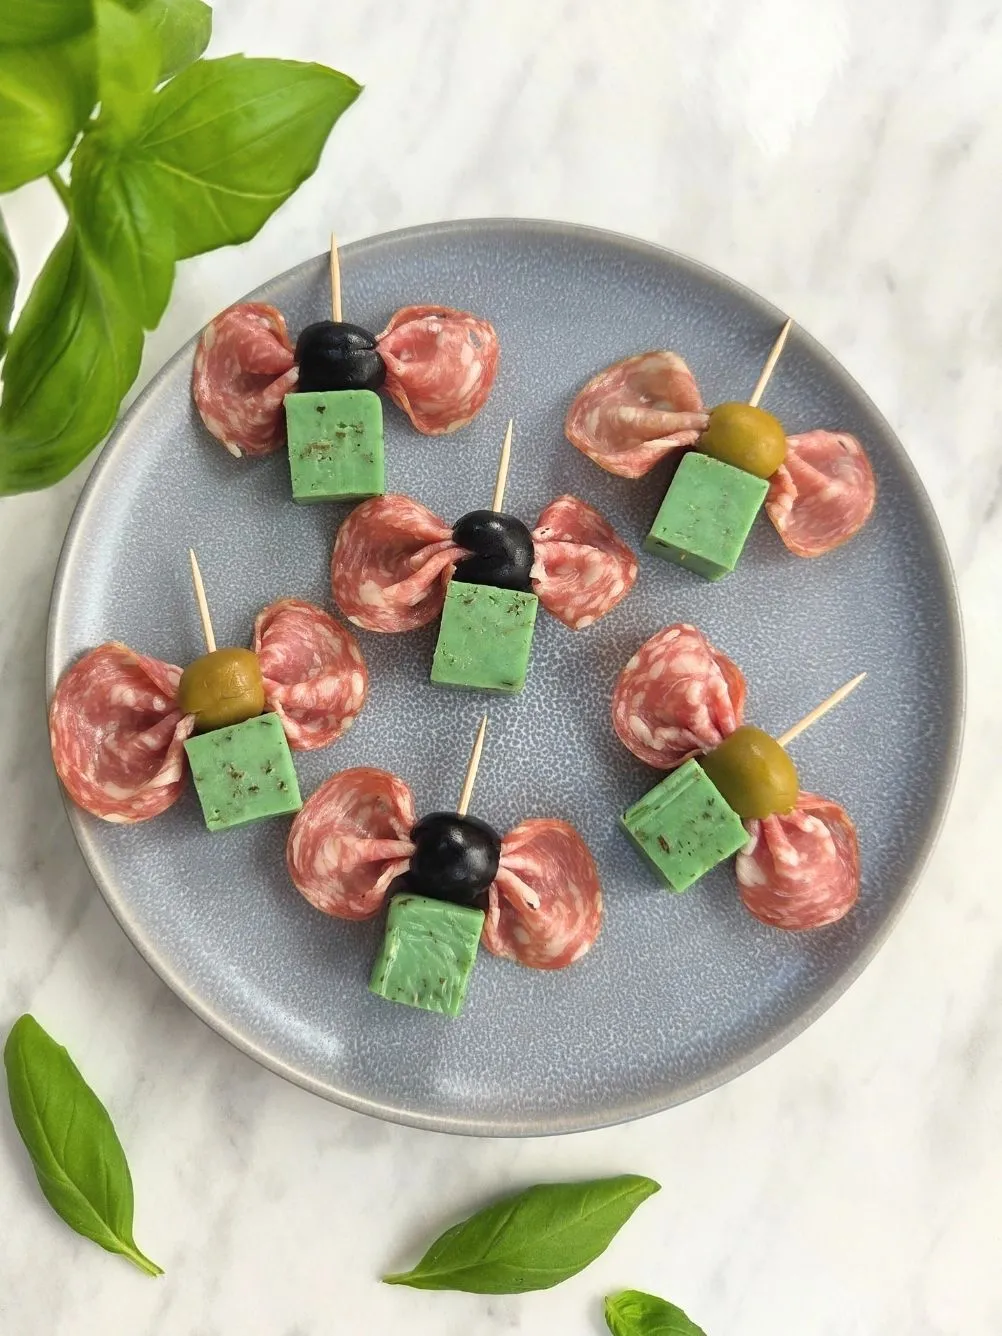
There’s something incredibly satisfying about combining classic flavors like salami, cheese, and olives into one bite-sized treat. These skewers are not just delicious — they’re also pretty to look at. I love how the folded salami slices resemble little bows, while the olive in the center gives them a polished, decorative touch.
This appetizer is my go-to whenever I need something:
- Quick to prepare but impressive to serve
- Portable and mess-free for picnics or parties
- Flavorful without needing to turn on the stove
Plus, it’s one of those recipes that’s endlessly customizable. You can swap in your favorite cheeses, use different types of salami, or mix green and black olives for a colorful presentation.
When to Serve These Skewers
These salami and cheese skewers shine in so many settings:
- Holiday gatherings: Their festive look makes them perfect for Christmas or New Year’s Eve platters.
- Summer picnics and barbecues: They hold up beautifully outdoors and don’t require refrigeration right away.
- Game day snacks: Serve them alongside chips, dips, or a cold drink for an easy finger food spread.
- Wine nights: Pair them with a chilled white wine or a light red for a perfect balance of salty and savory.
Honestly, I’ve even made them for simple Friday nights when I don’t want to cook — they turn an ordinary snack board into something special.
Easy Salami and Cheese Skewers Recipe

Ingredients You’ll Need
For each skewer, you’ll need just four simple ingredients:
- 1 slice of salami (thinly sliced, preferably round)
- 1 cube of basil cheese (or any semi-hard cheese you like)
- 1 olive (green or black, pitted)
- 1 toothpick

That’s it! You can multiply the ingredients depending on how many servings you want. For a small party, I usually make around 12–15 skewers, which fits perfectly on a medium-sized plate.
Ingredient tips:
- If you can find basil cheese, it adds a beautiful color and mild herb flavor. But regular cheddar, gouda, or mozzarella cubes work just as well.
- Choose good-quality olives — pitted ones are best for easy assembly.
- You can even mix green and black olives for a more playful look on your serving plate.
Step-by-Step Instructions
The photos show the simple process, but here’s how I make them step by step:
Step 1: Prepare the cheese cubes
Cut your cheese into even, bite-sized cubes — about 1 inch each. You want them firm enough to hold their shape when skewered.

Step 2: Fold the salami
Take one slice of salami and fold it accordion-style (like a fan or ribbon). Pinch it in the middle to form a bow shape. This gives your skewer that cute, decorative “bowtie” look.

Step 3: Add the olive
Take one olive and make a small slit on one side with a knife. This slit allows you to press the middle of the folded salami slice into it — the olive will hold the salami bow together like a clip.

Step 4: Assemble the skewer
Push a toothpick through the olive and salami bow, then through the cube of cheese. Adjust the pieces so they sit evenly and look neat.
Repeat the process until you’ve assembled all your skewers.


Presentation Tips
Presentation is half the fun with these salami and cheese skewers! Arrange them on a small platter or serving board in a circular pattern for visual appeal.
Here are a few extra ideas:
- Add fresh herbs: Scatter a few basil leaves around the plate for a pop of green and a hint of fragrance.
- Mix olive colors: Alternate black and green olives for variety.
- Drizzle lightly: Just before serving, drizzle a touch of olive oil or balsamic glaze for extra shine.
- Serve chilled: Pop them in the fridge for 15 minutes before serving so they stay firm and refreshing.
Flavor Variations
Once you’ve mastered the basic recipe, try experimenting with other combinations!
Here are some ideas to get you started:
- Mediterranean twist: Use feta cubes, cherry tomatoes, and salami.
- Italian-style skewers: Try mozzarella, pepperoni, and basil leaves.
- Spicy version: Use spicy salami and marinated jalapeño slices.
- Sweet & savory combo: Add a small piece of dried apricot between the cheese and salami.
Each variation brings a new flavor profile — and they all look beautiful on a platter together.
Why This Recipe Works So Well
What makes this appetizer such a hit is its perfect balance of flavors:
- The salty salami adds richness and texture.
- The creamy cheese gives a smooth contrast.
- The briny olive ties it all together with a pop of freshness.
Every bite feels satisfying and balanced — no cooking required, no stress, no mess. It’s the kind of recipe that lets you enjoy the party instead of being stuck in the kitchen.
Storing and Serving Tips
If you’re prepping these ahead of time:
- Store them in an airtight container in the fridge.
- Separate the layers with parchment paper so they don’t stick.
- They stay fresh for about 24 hours — just don’t add any drizzle or garnish until right before serving.
If you’re serving them outdoors, keep them in a cooler until it’s time to plate. They’ll stay firm and tasty for hours.
Perfect Pairings
These salami and cheese skewers go wonderfully with:
- Crackers or breadsticks
- A glass of wine, sparkling water, or a light cocktail
- Other small appetizers like nuts, grapes, or cherry tomatoes
You can even include them on a larger charcuterie board — they add structure and height to the arrangement while keeping everything finger-friendly.
Final Thoughts
These salami and cheese skewers are proof that simple ingredients can create something truly special. They look fancy enough for parties but are easy enough for everyday snacking. Every time I make them, people comment on how cute they look — and then immediately ask for the recipe.
Whether you’re hosting a big celebration or just want to enjoy a light bite, these skewers will always impress. They’re quick, elegant, and full of flavor — my kind of appetizer!
Try More Easy Appetizer Ideas
If you loved these salami and cheese skewers, you’ll also enjoy my other appetizer recipes:
- Cheese and Olive Skewers with Basil Cheese & Mozzarella — a fun, colorful variation perfect for picnics and parties.
- Fresh Peach Burrata Salad — light, juicy, and perfect for summer gatherings.
- Easy Chocolate Puff Pastry Pinwheels — a quick dessert to balance your savory bites.
And don’t forget to follow me on Pinterest for all my latest recipes and easy appetizer ideas: https://www.pinterest.com/dailyappetizer/
Salami and Cheese Skewers Recipe

If you’re looking for a quick, crowd-pleasing appetizer that looks as good as it tastes, these salami and cheese skewers are the answer. They’re fun to assemble, require only a handful of ingredients, and come together in minutes. Perfect for any gathering — from casual movie nights to elegant holiday spreads — this is one of those recipes that makes entertaining feel effortless.
Ingredients
- For each skewer, you’ll need just four simple ingredients:
- 1 slice of salami (thinly sliced, preferably round)
- 1 cube of basil cheese (or any semi-hard cheese you like)
- 1 olive (green or black, pitted)
- 1 toothpick
Instructions
Step 1: Prepare the cheese cubes
Cut your cheese into even, bite-sized cubes — about 1 inch each. You want them firm enough to hold their shape when skewered.
Step 2: Fold the salami
Take one slice of salami and fold it accordion-style (like a fan or ribbon). Pinch it in the middle to form a bow shape. This gives your skewer that cute, decorative “bowtie” look.
Step 3: Add the olive
Take one olive and make a small slit on one side with a knife. This slit allows you to press the middle of the folded salami slice into it — the olive will hold the salami bow together like a clip.
Step 4: Assemble the skewer
Push a toothpick through the olive and salami bow, then through the cube of cheese. Adjust the pieces so they sit evenly and look neat.
Repeat the process until you’ve assembled all your skewers.
Notes
Presentation Tips
Presentation is half the fun with these salami and cheese skewers! Arrange them on a small platter or serving board in a circular pattern for visual appeal.
Here are a few extra ideas:
- Add fresh herbs: Scatter a few basil leaves around the plate for a pop of green and a hint of fragrance.
- Mix olive colors: Alternate black and green olives for variety.
- Drizzle lightly: Just before serving, drizzle a touch of olive oil or balsamic glaze for extra shine.
- Serve chilled: Pop them in the fridge for 15 minutes before serving so they stay firm and refreshing.
Flavor Variations
Once you’ve mastered the basic recipe, try experimenting with other combinations! Here are some ideas to get you started:
- Mediterranean twist: Use feta cubes, cherry tomatoes, and salami.
- Italian-style skewers: Try mozzarella, pepperoni, and basil leaves.
- Spicy version: Use spicy salami and marinated jalapeño slices.
- Sweet & savory combo: Add a small piece of dried apricot between the cheese and salami.
Each variation brings a new flavor profile — and they all look beautiful on a platter together.