Easy Danish Butter Cookies Recipe
Danish butter cookies recipe lovers, this one is for you. If you’ve ever opened a blue tin of Danish butter cookies and thought, “I wish I could bake these at home”, you’re in the right place. This recipe delivers that classic, buttery, melt-in-your-mouth texture with simple ingredients and a method that actually works in a home kitchen.
This Danish butter cookies recipe is one I come back to again and again. It’s reliable, elegant, and surprisingly forgiving, even if you’re not an experienced baker. The cookies look beautiful, taste rich without being overwhelming, and they store incredibly well, which makes them perfect for both everyday treats and special occasions.

When I recommend this Danish butter cookies recipe
I usually make this Danish butter cookies recipe when I want something:
- Classic and timeless
- Easy to prepare ahead of time
- Perfect with coffee or tea
- Beautiful enough to gift
These cookies are ideal for holidays, cookie exchanges, afternoon gatherings, or simply keeping a small tin on the counter for sweet cravings. They also work wonderfully when you need a homemade treat that feels a little special without being complicated.
I especially love baking them during the colder months, but honestly, they’re welcome all year round. The dough comes together quickly, and the baking time is short, so you don’t need to commit an entire afternoon.
Why I personally love this recipe
What I love most about this Danish butter cookies recipe is the texture. These cookies are crisp on the outside, tender inside, and full of buttery flavor without being greasy. They’re not overly sweet, which makes them easy to eat one after another.
Another reason this recipe is a favorite is its versatility. You can keep it classic, or you can customize the shapes, sizes, and even flavors if you want. But at its core, this is a traditional recipe that doesn’t need much improvement.
And yes, they taste very close to the store-bought Danish butter cookies everyone knows, but fresher, softer, and more fragrant.
Danish butter cookies recipe
Ingredients overview (and why each one matters)
This Danish butter cookies recipe uses simple pantry staples, but each ingredient plays an important role.
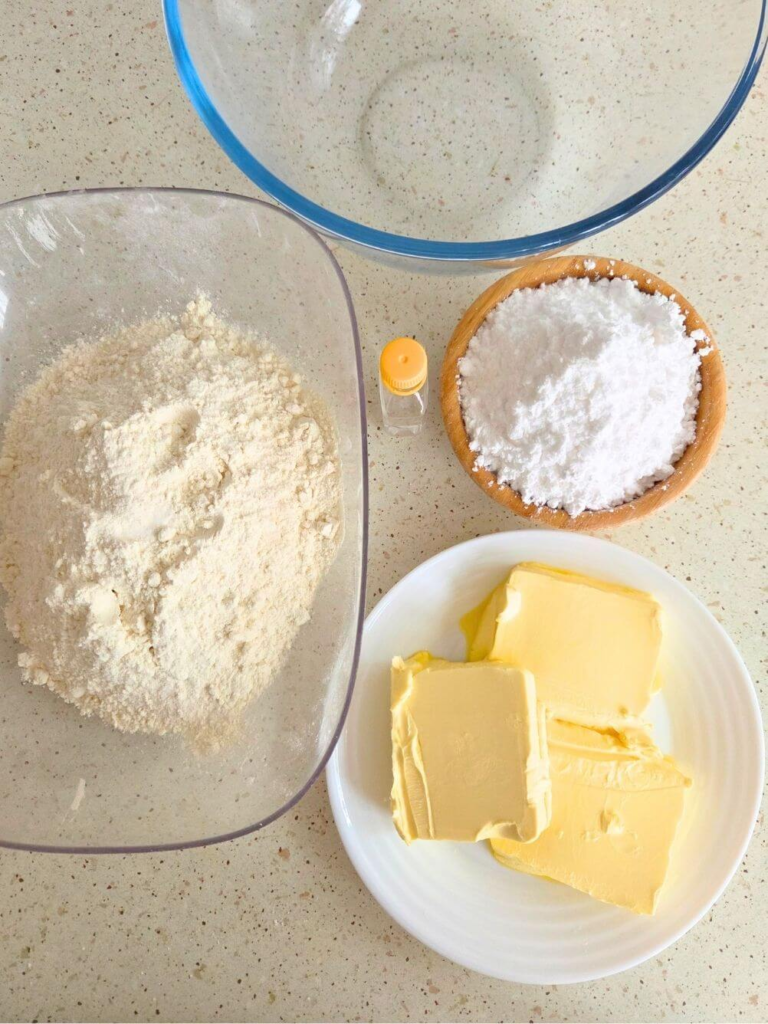
Here’s what you’ll need for about 40 small cookies:
- 1 cup + 2 tablespoons unsalted butter, softened (250 g)
The butter must be at room temperature. This is essential for a smooth, pipeable dough and that classic melt-in-your-mouth texture. - 1¼ cups powdered sugar (150 g)
Powdered sugar keeps the cookies delicate and tender. Granulated sugar would change the texture. - 1 teaspoon vanilla extract
Adds warmth and depth to the flavor without overpowering the butter. - A pinch of salt
Balances the sweetness and enhances the buttery taste. - 1–2 tablespoons milk
Helps adjust the dough consistency for piping. - 2⅔ cups all-purpose flour (320 g)
Provides structure while keeping the cookies light.
Using high-quality butter makes a noticeable difference here. The better the butter, the better the cookies.
Danish butter cookies recipe – step by step
1. Cream the butter and sugar
Place the softened butter and powdered sugar into a large mixing bowl.
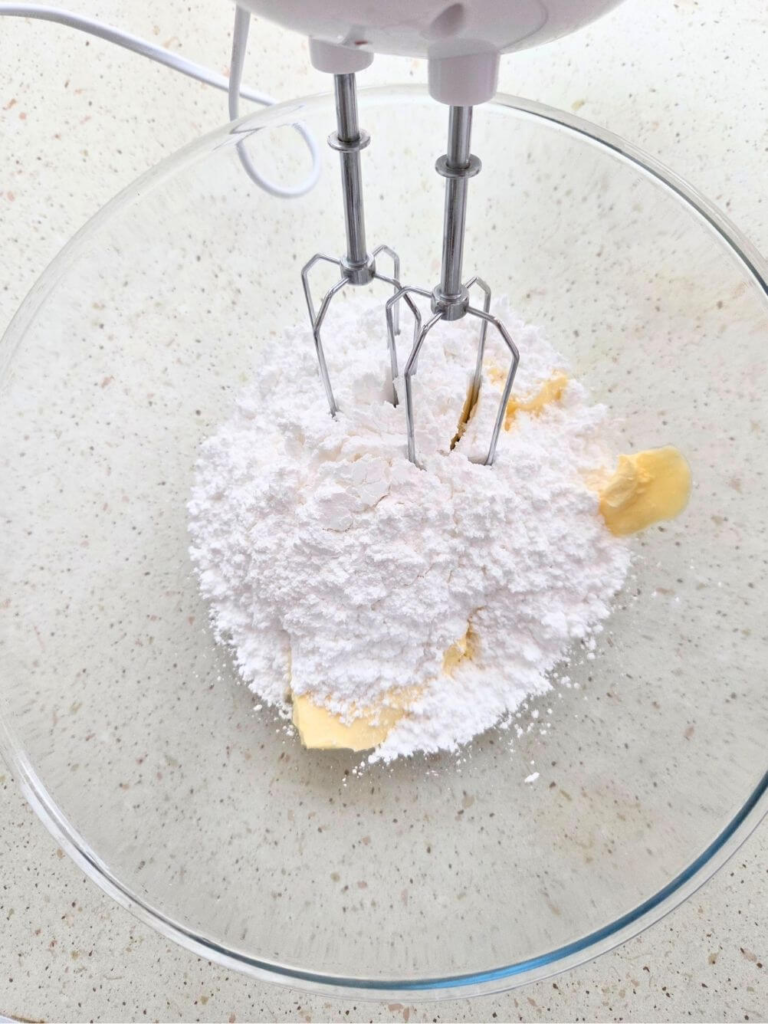
Using a hand mixer or stand mixer, beat for 3–4 minutes until the mixture becomes pale, fluffy, and creamy. This step is crucial because it creates air in the dough, which gives the cookies their tender texture.
Don’t rush this part. Proper creaming makes a big difference.
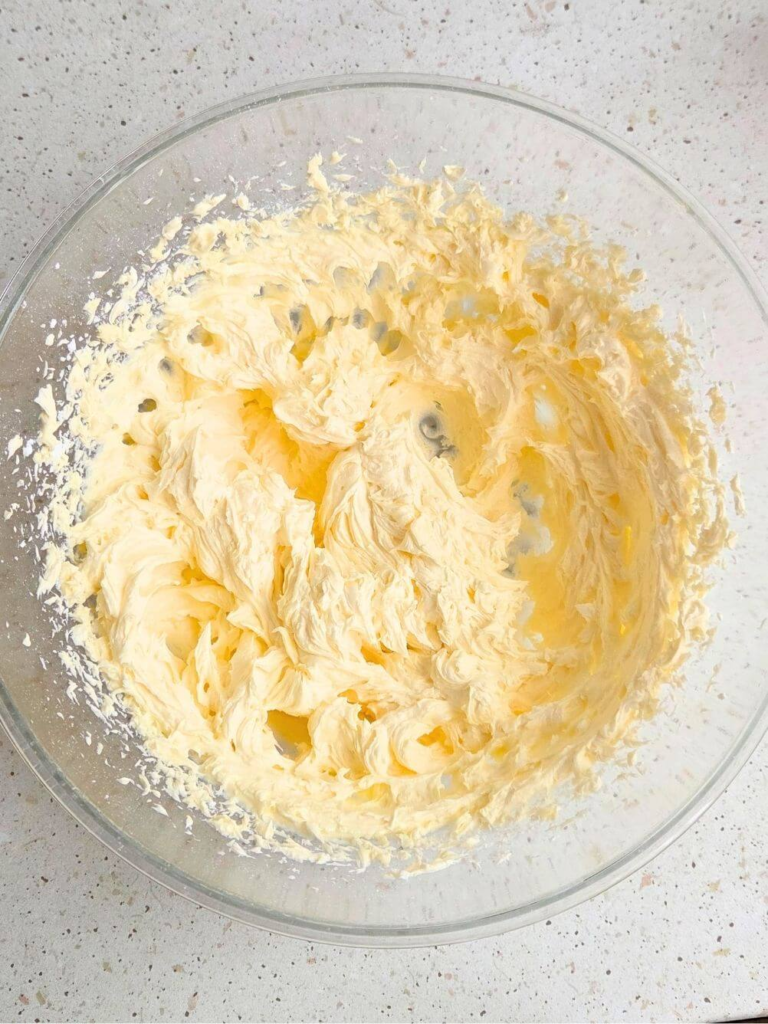
2. Add vanilla and salt
Add the vanilla extract and a pinch of salt to the butter mixture.
Mix briefly until fully combined. At this stage, the mixture should smell rich and slightly sweet.
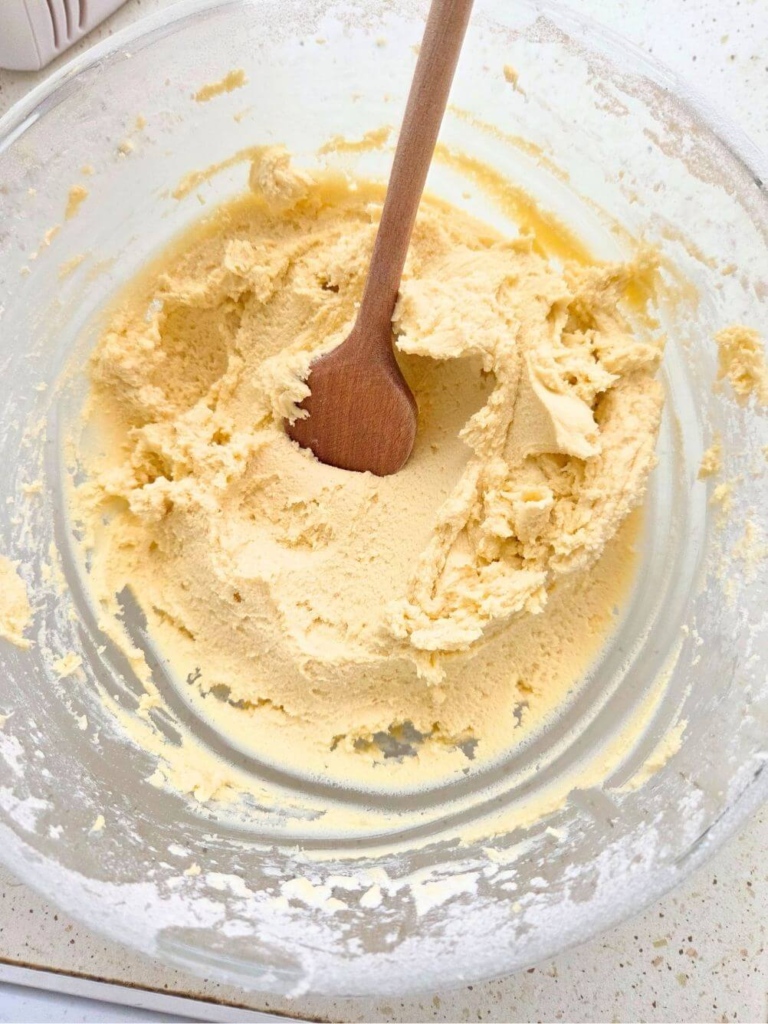
3. Incorporate the flour
Add the flour gradually, mixing on low speed.
The dough should be:
- Soft
- Slightly sticky
- Pipeable but not runny
If the dough feels too stiff, add 1 tablespoon of milk at a time until the consistency is right. You want a dough that passes easily through a piping bag without losing its shape.
4. Shape the cookies
Transfer the dough into a piping bag fitted with a large star tip.
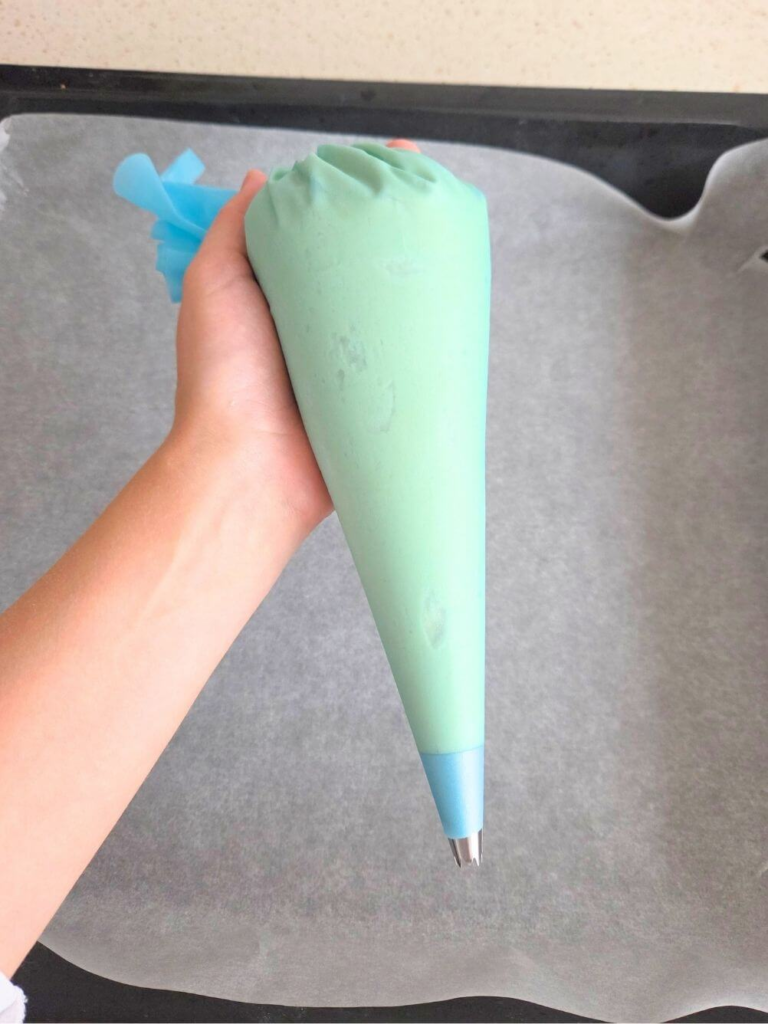
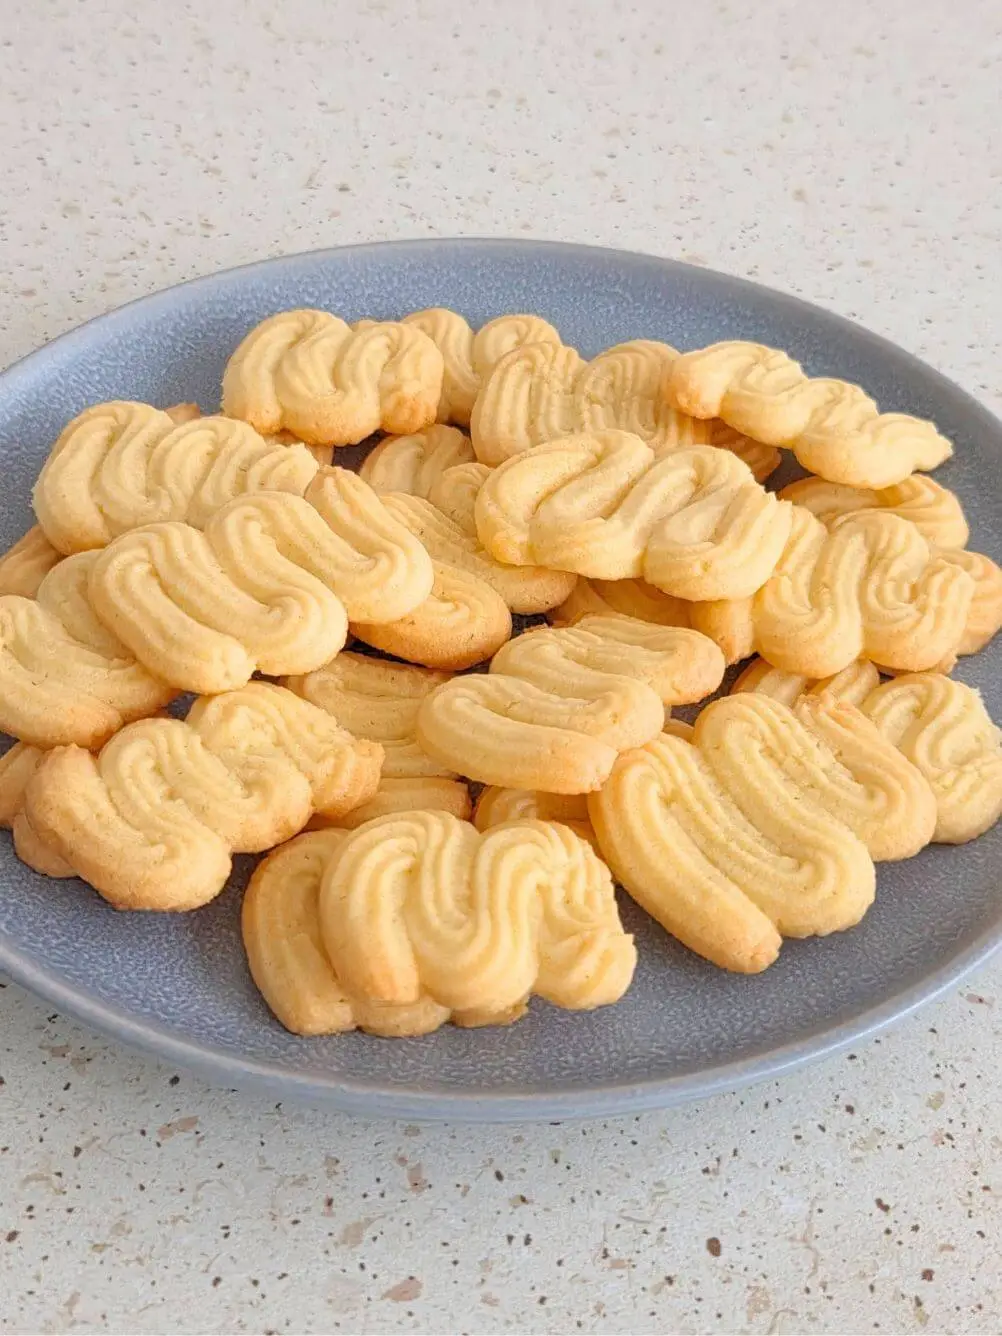
Pipe the cookies onto a baking sheet lined with parchment paper. You can create classic swirls, loops, or simple S-shapes. There’s no strict rule here, and that’s part of the charm.
Keep a little space between each cookie, as they will spread slightly.
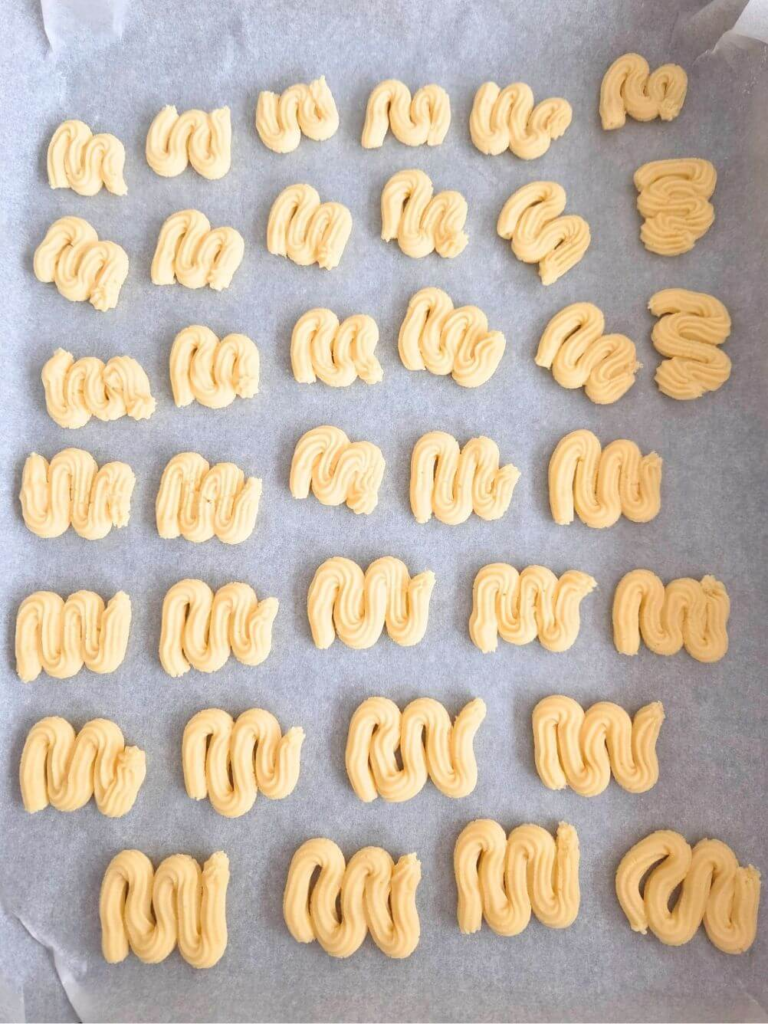
5. Chill the shaped cookies (important)
Place the baking sheet into the refrigerator for 15–20 minutes.
This step helps the cookies hold their shape during baking. Cookies made with real butter tend to spread more than those made with margarine, but both work well in this recipe.
Chilling is non-negotiable if you want defined shapes.
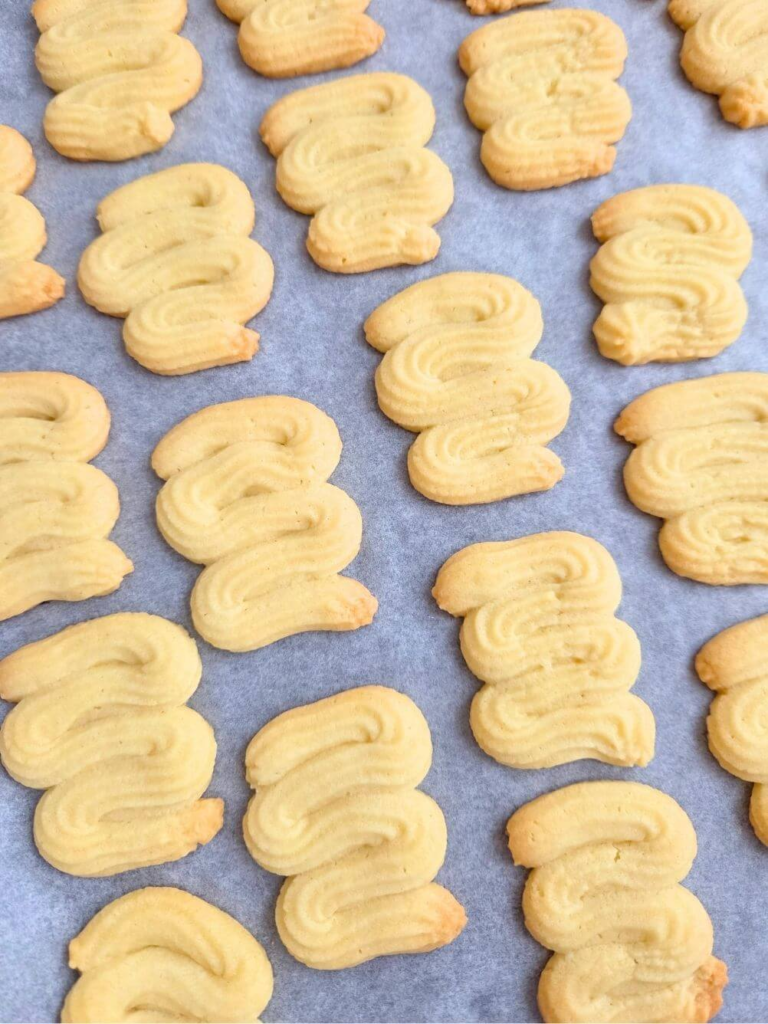
6. Bake
Preheat your oven to 350°F (180°C).
Bake the cookies for 10–12 minutes, or until the edges just begin to turn a light golden color. The centers should remain pale.
Avoid overbaking. These cookies should be tender, not dry.
Tips for bakery-style Danish butter cookies
If you want your Danish butter cookies recipe to turn out as close to store-bought as possible, keep these tips in mind:
- You can slightly reduce the sugar if you prefer less sweetness.
- Butter quality matters more than any other ingredient.
- Always watch the baking time carefully.
- Use a thick star piping tip for easier shaping.
Small details really matter with simple recipes like this one.
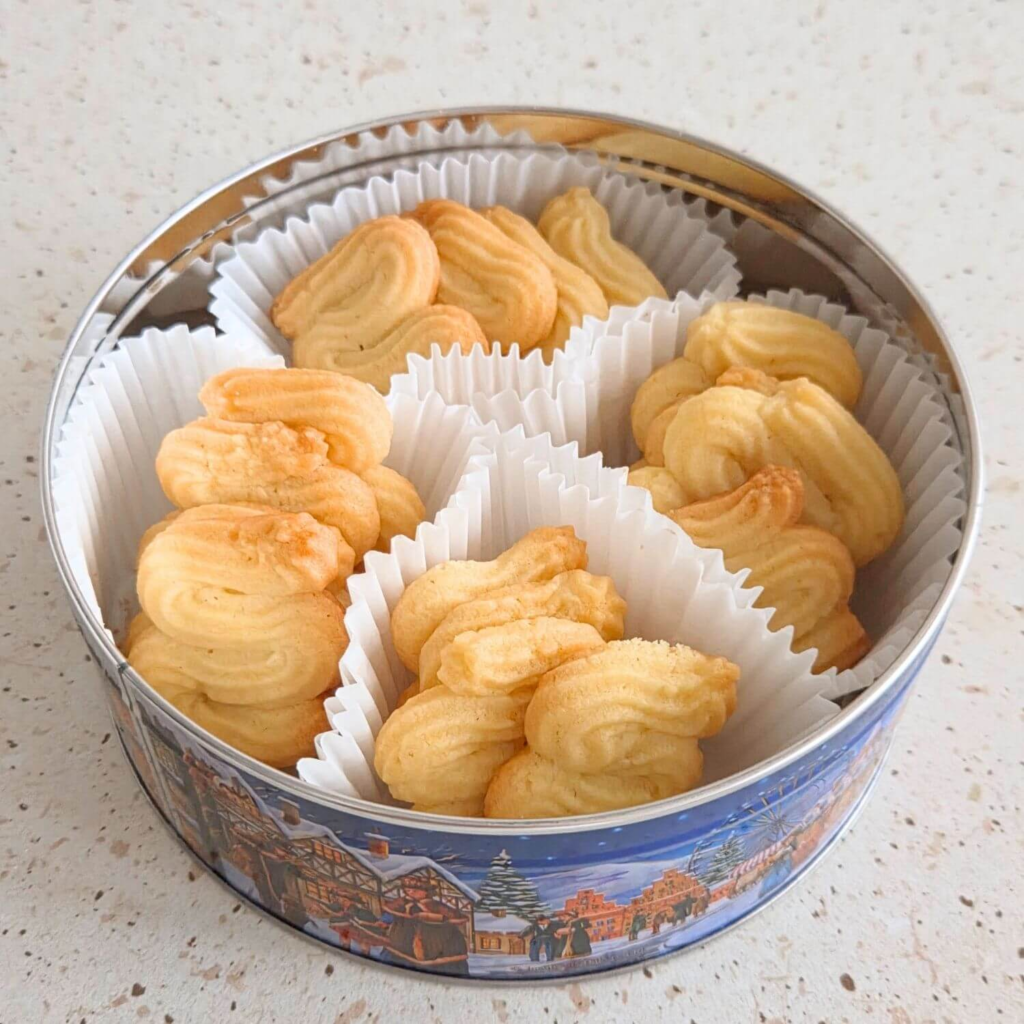
Storage and shelf life
One of the best things about this Danish butter cookies recipe is how well the cookies store.
- At room temperature:
Store in an airtight container for up to 7 days. - In the refrigerator:
They keep well for about 10–12 days, though room temperature is usually enough. - Freezing:
You can freeze the baked cookies for up to 2 months. Let them thaw at room temperature before serving.
They also travel very well, which makes them perfect for gifting.
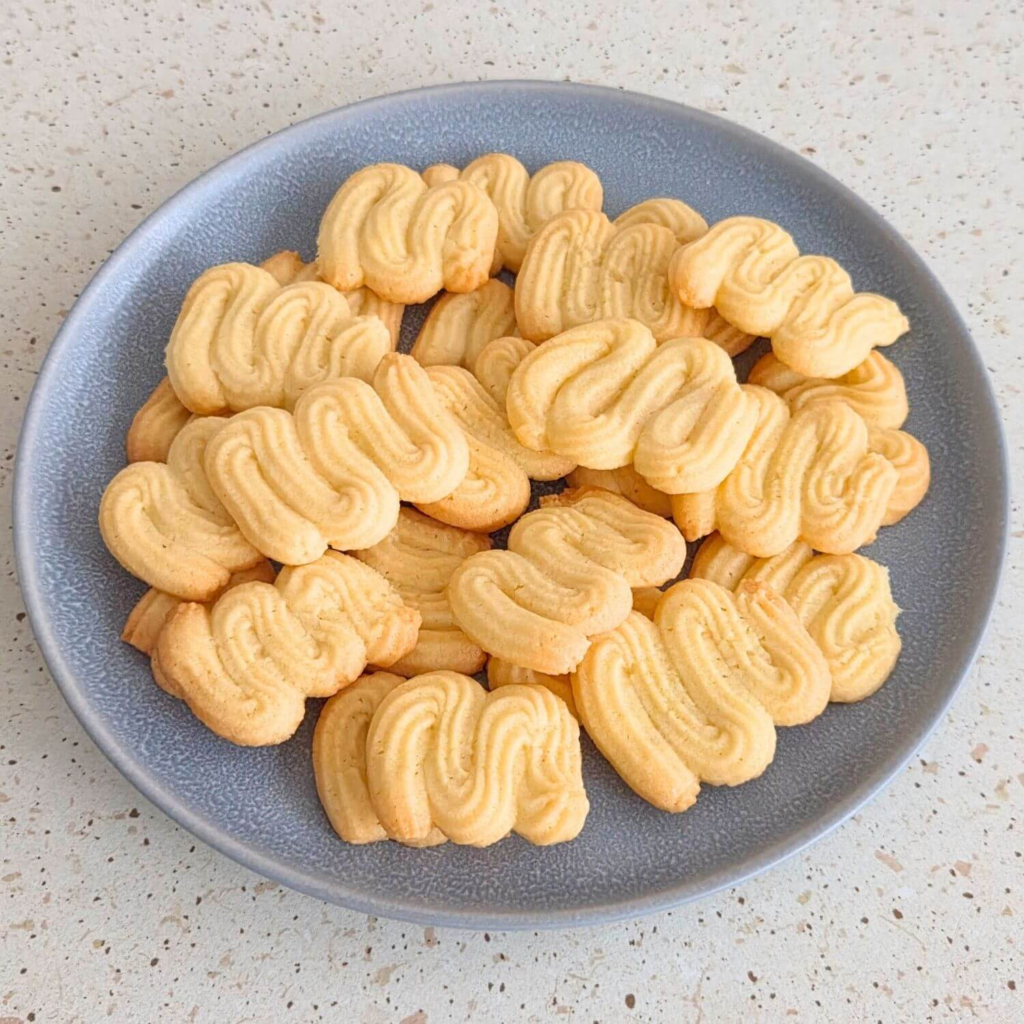
How to serve these cookies
These cookies are wonderful on their own, but they shine even more when paired with:
- Coffee or espresso
- Black tea or herbal tea
- Hot chocolate
They’re also beautiful arranged on a plate or packed into a tin for holidays and celebrations.
More recipes you might enjoy
If you loved this Danish butter cookies recipe, you might also enjoy these recipes from my site:
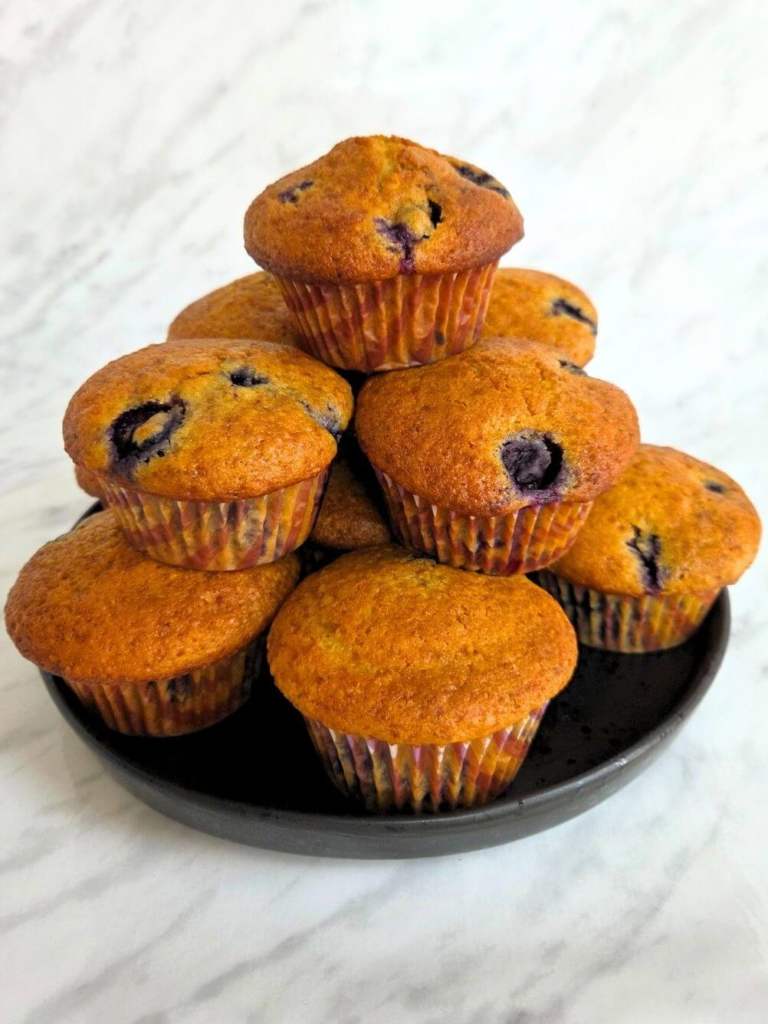
- Mini Cocoa and Coconut Baked Oatmeal
- Banana Muffins with Chocolate Chips
- Easy Beetroot Heart Cookies with Lemon and Ginger
Each one is simple, cozy, and perfect for everyday baking.
Follow along on Pinterest
I regularly share new recipes, baking ideas, and seasonal inspiration on Pinterest.
You can follow my Pinterest page here:
DailyAppetizer Pinterest
That’s where I post fresh recipes first and share step-by-step visuals just like this one.
Final thoughts
This Danish butter cookies recipe proves that simple ingredients can create something truly special. With a little patience, good butter, and careful baking, you can recreate a classic cookie that never goes out of style.
Whether you’re baking for family, friends, or just yourself, these cookies bring comfort, nostalgia, and that unmistakable buttery flavor everyone loves. Once you try them, they’re likely to become a regular in your baking rotation.
If you do make this recipe, I hope it brings a little warmth into your kitchen, just like it does in mine.
Danish Butter Cookies Recipe

Danish butter cookies recipe lovers, this one is for you. If you’ve ever opened a blue tin of Danish butter cookies and thought, “I wish I could bake these at home”, you’re in the right place. This recipe delivers that classic, buttery, melt-in-your-mouth texture with simple ingredients and a method that actually works in a home kitchen.
This Danish butter cookies recipe is one I come back to again and again. It’s reliable, elegant, and surprisingly forgiving, even if you’re not an experienced baker. The cookies look beautiful, taste rich without being overwhelming, and they store incredibly well, which makes them perfect for both everyday treats and special occasions.
Ingredients
- 1 cup + 2 tablespoons unsalted butter, softened (250 g)
- 1¼ cups powdered sugar (150 g)
- 1 teaspoon vanilla extract
- A pinch of salt
- 1–2 tablespoons milk
- 2⅔ cups all-purpose flour (320 g)
Instructions
1. Cream the butter and sugar
Place the softened butter and powdered sugar into a large mixing bowl.
Using a hand mixer or stand mixer, beat for 3–4 minutes until the mixture becomes pale, fluffy, and creamy. This step is crucial because it creates air in the dough, which gives the cookies their tender texture.
Don’t rush this part. Proper creaming makes a big difference.
2. Add vanilla and salt
Add the vanilla extract and a pinch of salt to the butter mixture.
Mix briefly until fully combined. At this stage, the mixture should smell rich and slightly sweet.
3. Incorporate the flour
Add the flour gradually, mixing on low speed.
The dough should be:
- Soft
- Slightly sticky
- Pipeable but not runny
If the dough feels too stiff, add 1 tablespoon of milk at a time until the consistency is right. You want a dough that passes easily through a piping bag without losing its shape.
4. Shape the cookies
Transfer the dough into a piping bag fitted with a large star tip.
Pipe the cookies onto a baking sheet lined with parchment paper. You can create classic swirls, loops, or simple S-shapes. There’s no strict rule here, and that’s part of the charm.
Keep a little space between each cookie, as they will spread slightly.
5. Chill the shaped cookies (important)
Place the baking sheet into the refrigerator for 15–20 minutes.
This step helps the cookies hold their shape during baking. Cookies made with real butter tend to spread more than those made with margarine, but both work well in this recipe.
Chilling is non-negotiable if you want defined shapes.
6. Bake
Preheat your oven to 350°F (180°C).
Bake the cookies for 10–12 minutes, or until the edges just begin to turn a light golden color. The centers should remain pale.
Avoid overbaking. These cookies should be tender, not dry.
Notes
Tips for bakery-style Danish butter cookies
If you want your Danish butter cookies recipe to turn out as close to store-bought as possible, keep these tips in mind:
- You can slightly reduce the sugar if you prefer less sweetness.
- Butter quality matters more than any other ingredient.
- Always watch the baking time carefully.
- Use a thick star piping tip for easier shaping.
Small details really matter with simple recipes like this one.
Storage and shelf life
One of the best things about this Danish butter cookies recipe is how well the cookies store.
- At room temperature: Store in an airtight container for up to 7 days.
- In the refrigerator: They keep well for about 10–12 days, though room temperature is usually enough.
- Freezing: You can freeze the baked cookies for up to 2 months. Let them thaw at room temperature before serving.
They also travel very well, which makes them perfect for gifting.